Friday, October 29, 2010

Halloween Weekend

Boo!  I have given a Halloween Party for more years than I can remember.  As I mentioned previously when I was working full time, it was difficult but somehow I was much better at planning ahead and always was ready to give the neighborhood party.


This is the children's table, sort of mid century with Jadite, Ruby Red Glassware and McCoy pottery.  I like to use my collectibles instead of having them on a shelf to look at.  The McCoy vase was from 1948.


This is the Shell Pattern produced by Anchor Hocking from the 30's to the 70's.  This was produced in the 60's.  The Royal Ruby Glass was also produced by Anchor Hocking in the 40's and 50's.


Ruby Red Glassware by Anchor Hocking


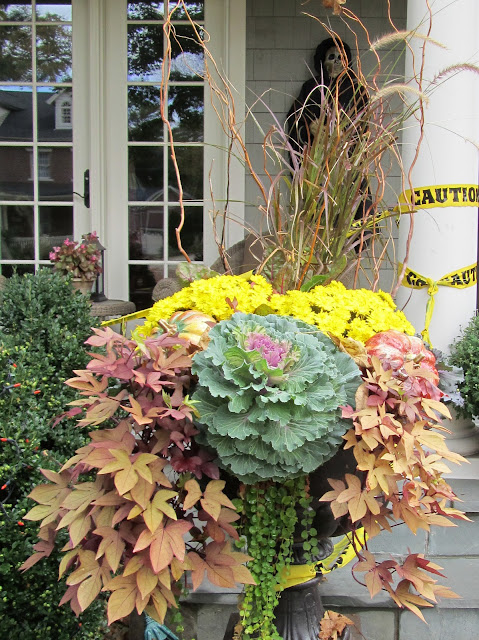
I love the colors that show up inside the cabbages after some time being exposed to the cooler weather.


Miss Bateman greeted me when I went into the back of the yard the other day.  I could not believe it was still blooming!


This year, I am all decorated outside and inside, have made apple pies (with Cortland apples from Door County, Wisconsin), chocolate cake and brownies.  I have also made what I call "kids lasagna," and barbecued ribs.  Of course, we will have appetizers, salad, homemade feather rolls (from the Fannie Farmer Cookbook) and garlic bread.  It's a lot of comfort food this weekend.


Pies can be made ahead of time uncooked and frozen.  Put in the oven frozen at 400 degrees and cook for approximately 45 minutes.

Solomon's Seal


Peacock Cabbage

The kids lasagna was a recipe from my former neighbor (who has left us way too young) that all of the kids and grownups loved.  It is quite a departure from the Italian version, but I feel I must share it with you since my granddaughter insisted I make it for Halloween:

           1 lb. of ground beef
           1 large can of crushed tomatoes
           1 large can of tomato paste
           1 medium onion
           2 cloves of crushed garlic
           1 teaspoon each of basil, oregano and parsley (fresh is better if you have
           any left in the garden)
           1 package of Swiss cheese, 12 oz or 16 oz
           16 oz carton of small curd cottage cheese
           16 oz package of no yolk egg noodles broad, cooked, rinsed and drained
           Salt and pepper to taste
           Parmesan Cheese shredded

The lasagna has been frozen uncooked ready to put in the oven at 350 degrees for 45 minutes to one hour until lightly brown and bubbly.


Brown beef, onion and garlic, add tomatoes, paste and herbs, salt and pepper to taste.  Boil noodles, rinse, layer half on bottom of 9x13 pan, layer half of beef mixture, layer half of Swiss cheese, half of cottage cheese and repeat whole process beginning again with noodles, sprinkle top with Parmesan cheese, cook at 350 degrees until bubbling and Parmesan is light brown.


Have a BOOtiful weekend!

Wednesday, October 27, 2010

The Great Pumpkin

Carving pumpkins into Jack-O-Lanterns is a centuries old tradition which began with the Irish carving turnips and beets as lanterns placing them in their windows, lit from the inside with a lump of coal.  They were used as a welcome for those who had passed on and as a deterrent to evil spirits. When the Irish immigrated to the United States in 1848 during the potato famine they could not find many turnips or beets, but found an abundance of pumpkins.  From this time on, the carving and lighting of the pumpkin became a tradition in the United States on All Souls Day.  This tradition later became transferred to the day we celebrate Halloween.

A traditional Irish Halloween Jack-O-Lantern from early 20th century at Museum of Country Life, Ireland

Did you know that pumpkins are not a vegetable - they are a fruit!  Pumpkins, like gourds and other varieties of squash are all members of the Cucurbitacae family, which also includes cucumbers, gherkins and melons.  Pumpkins have been grown in America for over 5,000 years.  They were unknown in Europe before the time of Columbus.

If you are going to carve a face in your pumpkin it works very well with an elongated pumpkin rather than a round squatty one.  It is so much easier to carve if you have a very ripe pumpkin, hard to know this until you stick in the knife.  Sketch out your face on the best side of the pumpkin,, cut a circular lid on top (large enough to insert an LED candle) scoop out all of the seeds. Separate the stringy fibers from the seeds and wash the seeds in a colander.


I think the children are better artists than I am

If you are doing this with children it is fun to let them tell you how it feels when they scoop out the seeds, talk about shapes, colors, ask them how many seeds they think are in the pumpkin.  Help them lift the pumpkin, how much do they think it weighs, show them on a scale.  I think you get the idea, this can be a multi-level integrated experience for children.  Lay the seeds out on paper towels and when dry, it is a great activity to count them by ones and then tens.  It is always amazing how many seeds are in a pumpkin!


This is certainly not a professional carving job!


You can't stop eating them!  This is a child tested recipe for pumpkin seeds.

     Make sure the seeds are dry
     Put them in a frying pan with butter and salt
     Cook slowly until brownish stirring often
     Drain on paper towel


Yum, Yum!


LED candles fit inside and are safe.  I have a six inch one in this pumpkin.

Sunday, October 24, 2010

Christmas Amaryllis

Christmas Amaryllis are not the type you buy at your local nursery or big box store, unless they say, "Christmas Amaryllis."  They can be ordered online http://www.johnscheepers.com/ or sometimes can be found at a specialty nursery.  I am sure there are many other reputable suppliers.  The larger the bulbs, the more flowers that will be produced.


Christmas Amaryllis "Cocktail"

The nice  thing about the Christmas Amaryllis is that they grow in about half the time as regular amaryllis.  I am about ready to plant them hopefully to bloom for Christmas.  I can plant them in stones and water and they will bloom just fine or if I want to keep them from year to year they should be planted in soil. This will determine what type of container you want to use, glass if you are using decorative stones and water, obviously not glass if you are using soil.  I don't think you want the look of roots crawling through the glass, but who knows?

I think I am going to use glass and stones this year, as I have never kept my amaryllis over from year to year.  I am bad, but I just don't have an area to store them.  So, I take the hit and buy them and then dispose of them at the end of the season.

I have already purchased some red painted branches from Home Depot (first year I have noticed them there) also were available in gold and white, and I will use them to hold up the leaves as the amaryllis develop, much better than string tied around them.  I think these are just shrub branches that have been spray painted (you can do this yourself if you have some shrubs that you have thinned.  Although these were inexpensive ($5.99). 


You know the amaryllis bulb is ready to plant when you see the green leaves beginning to poke through the top.

I purchased the glass containers (the deeper the container the better, even the miniatures grow quite tall) at Hobby Lobby, a craft store, and the colored stones at a decor store, but I am sure they are available at many different types of locations.


 Approximately one cup of stones in each container for the bulbs to sit on


I carefully poured into the containers an additional two cups of glass stones to surround the bulbs.  You can shake them a little side to side to even them out.  I also poured in a little less then two cups of water in each and will siphon some off with the turkey baster so it is not too high on the base of the bulb.

This will be better, just so the roots have access to the water.

We would like them to bloom for the holidays so the timing can be a little tricky.  The Christmas Amaryllis can take four to six weeks and the regular amaryllis up to twelve weeks.  It is aways better to be early as you can hold them in a state of suspension by putting them in a cooler place like an attached garage, enclosed porch, cooler basement room (you don't want them to freeze).


The twigs do not need to be placed inside the containers at this time but this just gives you an idea of how they work.  You can take them in and out for best placement in supporting the leaves.


Friday, October 22, 2010

Blogging 101

We have all been there, sitting in front of a computer signing up to begin a blog. Oh, that part is easy, do this, do that, click, apply. Wow! I have a blog.


Nasturtiums still blooming, where did that color come from?

Most of us realize pretty quick that there is no one to answer the multitude of questions that we have. Sometimes, we find a friend online who will give us some basic information on how to upload photos, how to keep those photos with the post, how to put a photo on a header that doesn't look giant and many more.


Cabbages on one of my neighborhood excursions.


I met a fellow blogger at one of my garden club meetings. Her name is Mary Anne and she is an interior designer who owned a retail design shop for twenty-four years.  She had already hired someone to help her with the intricacies of blogging but, as we all know, blogging is not just computer expertise.


This was the home I went by a couple of weeks ago where a crew was putting in the plantings.  It turned out to be both mums and cabbages.


We found lots of bargains at Home Depot for  my daughter-in-law's alley garden, daylilies for $1.97???

Being about ready to pull her hair out we made a date to do some blog set-ups on the new Template Designer.  After figuring out how she could log on to my computer as a new user (she did not have a laptop) we were on a roll, picking a template, choosing colors, print style, adjusting widths, etc., so much to do, so little time.


Miscanthus Pupurescens Flame

It is not over, is it ever?  But, Mary Anne is on her way as a new blogger with many more questions, experimentation and friends to meet.


Panicum Northwind

I have spiced up this blog today with some of my waning garden photos.  You can visit Mary Anne at http://alwaysrobinseggblue.blogspot.com/


Miscanthus (not sure of the name)

Remember, it is a work in progress, the header may change, colors, text and layout may change but we are all happy to support new bloggers.


Happy Weekend!

Wednesday, October 20, 2010

How Strange Is This?

It is just my serious garden group meeting and I mean serious!  Our workshop this day was on organic gardening with ammonia, yogurt, vinegar and molasses.  I don't think I could possibly fit in everything in just this one blog, but you will get the idea of where this is going.


The maple that overlooks my garden from my neighbor's home

Our presenter was a graduate of Ornamental Horticulture at a big ten university, so the credentials were there.  I was all ready to listen and find out how to get rid of my rose midges.  So I asked, how do I get rid of the rose midge?  Our presenter said he had never heard of this (although it is all over the internet) but that all insects will disappear if we use a formula to help the plant repel all infestations.  Pesticides did not appear until after WWII and before that just about everything had an organic solution.  I guess they just didn't know what to do with all of those leftover chemicals!

This is my daughter-in-law's container that we put together with the bronze sweet potato vine left over from the summer with Creeping Jenny, mums, cabbages, grasses, and willow.

The consensus is that if the plants are healthy they will not support disease.  It sounds feasible so I was totally focused on listening to these remedies that were in existence before I was born. 

2 ounces of Blackstrap Molasses
2 ounces of Cider Vinegar
2 ounces of Ammonia (non-sudsing)

Mix with one gallon of water and do one time each week.  Start this recipe when the plants have been in the ground about 5 to  6 weeks.  Do not use on spinach, lettuce or swiss chard.

He said this is what would cure my rose midges and to use it this fall so that it is in the ground before frost.

Stop using Killer Chemicals he said.  Plants don't have stomachs, so the digestion has to happen in the soil.

Liquid weed killers are better than than dry because they are absorbed in the leaf and stay out of the soil.  Dry killer chemicals get into the soil and do a lot of damage. Spot weeding is his recommendation.  He is a big proponent of gypsum and milorganite,both of which have been around for a long time.

He says grass is a sun plant and don't even attempt to grow it in the shade, choose mulch or shade plants.  I know, you are saying there is "shade grass," but he says it will never do well because all grass wants sun.

He recommends planting trees that are meant for your area, know what your soil has and needs, apply gypsum every year if you have clay soil, mow high, water the lawn for one hour, once per week from mid September to Halloween (remember some of these suggestions are meant for zone 5 which is getting ready to shut down for the winter - warmer climates move the months forward somewhat).

You can check this all out at http://www.pure-prairie-organics.com/

There was so much more that I am totally confused at this point in regard to proper fertilizations and insect interventions. As I departed, I asked our hostess if he taught a class anywhere in the area.  She said she would certaily check this out.  I feel I know so little about these organic interventions at this point and I certainly don't want to put any of my plantings in jeopardy.

This is a little Irish Cottage that my son built for his youngest daughter.  It has become a playhouse for the whole family.

I will try this organic intervention on my roses as the chemicals have not worked and they are not setting buds.  I will let you know what happens, although it may not be this year!

It's getting a lot scarier around here!

Monday, October 18, 2010

Fall Bulb Planting

The most important step in planting bulbs in the fall is to purchase large, high quality bulbs.  The 14/15 or 16/17 notations relate to the size of the bulb.  The higher the numbers the larger the bulb which will produce more and larger blooms.  Make sure the bulbs are firm, not soft or moldy.


This is Itzim Daffodil laid out in alternating triangles.  It is a smaller daffodil so I place them four or five inches apart.

Daffodil Itzim is a good replacement for Tete-A-Tete because it has a longer bloom time and is approximately the same size.

I use an auger attachment on the end of a drill to get through difficult soil and groundcovers, smaller bulbs that require more shallow planting can be put in with a hand trowel.  Some people dig large areas and place many bulbs in groupings.  This only works if you know there is nothing else in the area that you will disturb.

The Lirope that grows under the pear tree has been cut back because it is very difficult to plant in this area and the grass turns yellow during the winter.  It softens quite a bit and is very difficult in the spring.


I sprinkle a little bulb fertilizer in the hole, mix it up a little, put the bulb in point up.  If you're not sure which is the top you can always lay it sideways and it will come up just fine.


We put in some more Orange Emperor Tulips around the Chanticleer Pear.  Here it is pictured with Sweetheart Emperor.

Another very early daffodil called Early Sensation was added to the borders in front of the house.  They are pictured above on the south side of my home last spring - long blooming.

Cover with soil and mulch, tamp down with your feet when done, supposedly this will help deter critters.  I'll try anything as I have a major problem with squirrels in the fall and rabbits in the spring, mostly for tulips.  Plantskydd for Critters seemed to help last year and I also used chicken wire with metal garden staples.

I also put in three different varieties of Orienpet Lilies (a cross between Asiatic and Oriental Lilies).  They range in height from three to six feet.  They look great peeking out from behind other plantings, phlox, roses, daisies, etc.

Conca d'Orr

Lavon

Satisfaction

Bulbs can be planted until the ground freezes hard.  I have actually planted bulbs as late as December in zone 5 (not a recommendation).

It seems like a lot of work but so rewarding to look out and see the fruits of your labor in the springtime!